TagRanger®
How to create configuration profiles
Manage the configuration settings of your TagRanger® system using Profiles
We recommend you set up your Finder/Relay/Tags using the Profiles feature where you can create named custom parameter sets that can be easily rolled out to your devices. Parameter sets are backed up to your User Account so you could reinstate a broken Finder/Relay or replicate a Tag configuration with ease. Using profiles does not prevent you from changing individual parameters on specific devices as necessary through the respective device Configuration settings.
Profiles Tab
The profiles tab allows you to create new profiles and shows the list of any profiles you've already made.
Network Profile
The Network Profile can be applied to both your Tag/Finder/Relay - it's essential that your devices have the same network settings for them to communicate. This profile contains the basic details of the LoRaWAN and UWB Ranging radios.
Tag Profile
The Tag Profile can only be applied to your Tag and defines all of its operational functions.
Banks
All devices support multiple versions of configurations through the use of 'Banks'. Numbered 0 through to 4 (0 is the 'Home' network) each bank is an independent set of configuration settings, the one in use at any one time is referred to as the 'ACTIVE BANK'. This allows you to quickly change the configuration of a device by simply changing the Active Bank on a device. This is extremely powerful and changing Active Bank can also be done remotely using the 'Switch Config' menu option on the Track tab.
Apply The Profile
The profiles can be applied to any individual device or to all of your devices with one action, saving time if you are deploying many Tags. Press the 3 dot menu followed by 'Apply' to select which Bank to apply the profile to, followed by which Device the profile gets applied to. A Tag will require both a Network and Tag configuration, a Finder/Relay will just need the Network configuration.
Important: Your Network profile in ALL of the Tag banks must match the Network profile of the Finder you want to use with that Tag. You can however, set up one bank to have a Network profile for your own Private LoRaWAN network as well as another bank for your Finder. This allows you to switch from Finder to Private Network and vice versa.
New Network Profile

On your TagRanger® App go to the Profiles tab and tap the icon next to 'New network profile'.
You will be presented with a menu of categories for modification.
Tap on a category name to expand the settings.
Profile Identification
Profile - Enter a name of your choice for this profile
LoRa Radio (Finder mode)
Device Mode - FINDERDEVICE setting for communication with a Finder
LORADEVICE setting for communication with a private LoRaWAN network
LoRa maximum transmit power - Set at 15dBm for maximum range (Note, this is an internal setting and does not represent the antenna EIRP)
LoRa band - Set to EU868 or US915 depending on your local territory regulations
LoRa data rate - Set to SF12 (21 messages/hour) or SF11 (39 messageges/hour) for maximum range. Settings of SF10/9/8/7 are also possible with decreasing range versus increasing messages per hour
LoRa switch config on inactivity - Used when switching between a Finder and private LoRaWAN network. Number of seconds of network inactivity before switching to 'Home' network configuration. Zero is disabled.

LoRa Radio (LoRaWAN network mode)
Additional LoRaWAN settings are available when LORADEVICE mode is selected as follows:
Application EUI - Network joining address automatically generated by the App. Press and hold to automatically generate a new address. If using your own private LoRaWAN network you will need to update this information manually
Application key - Cryptographic key used only with the the network join procedure when using OTAA. This is randomly generated by the app when a new profile is created. Press and hold to randomly generate a new value. If using your own private LoRaWAN network, you will need to retain a copy of this value or enter it manually to match the value used in your network
LoRa adaptive data rate - This setting is only available if you are connecting to a private LoRaWAN network to optimise power consumption and messages per hour
When setting up your network gateway there are some other parameters you may need to enter as follows:
LoRaWAN version - 1.0.2a
Device Class - Class A
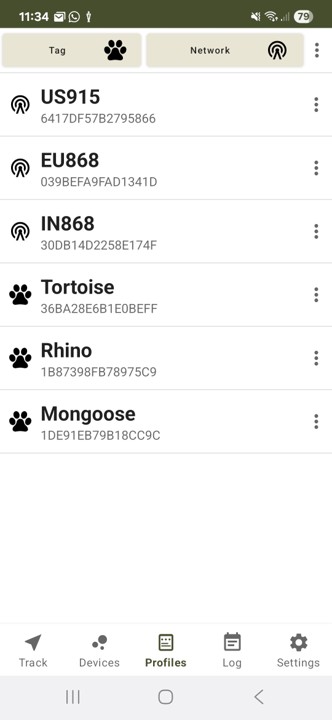
Device EUI - This is a combination of [1C0738F1] + [Tag Device ID]. The Tag Device ID is the number in brackets after the Tag name when you look at it in the phone App.
For example, take the following device:
![]()
The Device EUI = 1C0738F163733F62
You should also disable Frame Counter Checking in your network configuration (done on a per device basis) as the frame counter does not persist in the Tag if it is reset.
New Tag Profile

On your TagRanger® App go to the Profiles tab and tap the icon next to 'New tag profile'.
You will be presented with a menu of categories for modification.
Bluetooth Always On
Bluetooth will always be activated on the Tag when this switch is turned on. This is useful when experimenting or setting up the Tag. When this switch is turned off the Bluetooth will only remain on for 1 minute before turning off. To restart the Bluetooth in this situation the Tag must be turned off, then turned on again. When you 'Deploy' the Tag you will be warned if the Bluetooth Always On is set and should make sure it is turned off to avoid excessive battery drain when the Tag is deployed.
Network Profile
First use the "Network Profile" drop down menu to select one of the Network Profiles you have already created to use with this Tag profile.
Tap on a category name to expand the settings.
Profile Identification
Profile - Enter a name of your choice for this profile


LoRa Radio Calendar
Tx Calendar - The LoRaWAN transmitter will only be allowed to transmit during periods you allow in this calendar, no matter what your other settings are. A crossed out hour/day/month will prevent ANY transmissions during that period to help save battery power. There are many reasons you may want to do this, for example only allowing transmission when you know an animal will be active, or when you will be actively in the area and trying to collect data. You may want your Tag to be dormant for long periods of time with short bursts of activity, if for example you were doing periodic filming over a year.
For example, If you have set your Tag to ping every 30 minutes (Ping Period setting), but you have crossed out all of the hours between 7pm and 6am, then your Tag will ping every 30 minutes but only during daytime hours (6am to 7pm), during th enight it will be disabled.
Rx Wakeup Mode - This sets how often the LoRaWAN receiver will listen for a wakeup signal in normal operation (not prevented by calendar). With a "Fast" setting the receiver will 'listen' for a wake up request every 4 seconds. This means the Finder needs to transmit for a duration of 4 seconds to allow the receiver time to detect the signal. The setting can be slowed down to Medium (8 seconds) or Slow (16 seconds) which will significantly improve Tag battery life. The downside is that the Finder/network transmitter will need to transmit for longer which means Finder battery life is reduced, Tag response times are slower and also the Finder airtime allowance will be reduced resulting in fewer transmissions per hour allowed.
Rx Calendar - The LoRaWAN receiver will only be allowed to receive messages from your Finder or LoRaWAN network (Location, Finding, Ranging requests etc) during periods you allow in this calendar, no matter what your other settings are. A crossed out hour/day/month will prevent the Tag receiver turing on during that period to help save battery power. This will limit the times when you can remotely wake up your Tag and help to conserve power when you know you will not need to contact it. For example, if you only ever want to wake the Tag up during the day, then you can just select a range of daytime hours, similarly for certain days of the week, and even months of the year. The more you limit the receiver turing on, the greater the battery saving will be. Not, other background tasks will still continue, such as GPS scheduling for example.
15 minute emergency fallback - To avoid the danger of locking yourself out of communication with the Tag for long periods of time, you can set a daily 15 minute window where the LoRaWAN receiver will operate. During this time it will be possible to wake the Tag up and change to a different Configuration Bank if your plans or requirements have changed. Note, will need to have a suitable alternative Configuration Bank already set up on the Tag before you deploy for this to work.

LoRa Network Join (Only available if a LORADEVICE network profile is used)
LoRa join mode - From the outset, a Tag has to 'join' the LoRaWAN network, there are two methods for this:
OTAA - Over The Air Activation: When a Tag boots up it sends a request to join the network. If the network receives the request it will respond with an acknowledgement if the tag is registered to that network and the security credentials are generated dynamically.
ABP - Activation by Personalisation: When configuring a Tag the network credentials are randomly generated and pre-programmed in to the Tag. No network join request is required and the network and Tag will always use the same static network credentials to communicate with each other.
LoRa rejoin period - Only required in OTAA mode. How often the Tag should rejoin the network. A periodic rejoin will re-establish new network credentials dynamically.
LoRa join fail retry - Only required in OTAA mode. How long to wait before retrying to join a network in the event of a failed request.
LoRa link check - Only supported in OTAA mode and when using LORADEVICE mode. The tag will request a link quality check periodically (or on a surfaced event in marine applications). If the link check fails successively a number of times then a network re-join is triggered.

Ping
Ping Period -Sets the time (seconds) between pings when PERIODIC Mode is selected. Set this value to 0 to disable pings. This setting is ignored if GNSSUPDATE mode is selected.
Ping Mode -
PERIODIC sends a regular LoRaWAN transmission (ping) including the last known GPS location
GNSSUPDATE will send a ping everytime a new GPS position is acquired
Note that all Pings will be disabled during any period where the Tx Calendar setting is crossed out.


GPS
GPS Period - Set the time (in seconds) before the next GPS attempt (e.g. Every 6 hours = 21600 seconds)
GPS Calendar (UTC time) - The GPS receiver will only be allowed to operate during periods you allow in this calendar and the GPS period is ignored. A crossed out hour/day/month will prevent the GPS turning on during that period to help save battery power. For example, if you were monitoring an animal that slept in a burrow during the night, you could disable operation during nightime hours to save battery power, then during the day the GPS will follow the normal "GPS Period" setting.
GPS Profile - Contains presets for the GPS receiver to simplify setup. Select a profile that closely matches the environment in which your Tag will be deployed. The presets adjust things like timeout periods and accuracy thresholds.
An expert user may select the "Custom" setting which gives access to the low level GPS settings which may be adjusted:
GPS Model - This presets a number of GNSS parameters to optimise performance. It should not normally be necessary to change this setting
GPS HDOP Filter Enable - Sets the acceptable accuracy of the GNSS before declaring a fix (may be increased by a few points to speed up fix time at the expense of accuracy)
GPS HACC Filter Enable - Sets the acceptable accuracy of the GNSS before declaring a fix (may be increased by 50/100/150 to speed up fix time at the expense of accuracy)
GPS allow any fix - If the GPS times out before achieving the required fix accuracy, this will allow the reporting of the best fix the receiver has at that time (if any)
GPS early terminate period - THis is the time limit the GPS will run for if it doesn't receive any GPS signals after turing on. (Saves battery if the Tag is out of GPS signal range)
GPS Timeout - How long the GPS should attempt to get a fix (location) before aborting

AXL (Accelerometer)
AXL Profile - Contains presets for the accelerometer to simplify setup.
Disabled - Disable accelerometer
Mortality - Accelerometer detects when there has been no motion for a period of time exceeding the 'Inactivity Period'
Tamper - Accelerometer detects any movement of the Tag
Impact[2G] - Accelerometer detects an impact greater than 2G
Impact[4G] - Accelerometer detects an impact greater than 4G
Impact[8G] - Accelerometer detects an impact greater than 8G
Custom - For expert users this gives access to the accelerometer low level settings
Ping on accelerometer -Generates a ping whenever an accelerometer event occurs (subject to the LoRa Tx Calendar settings)
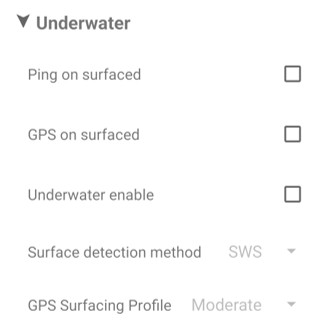
Underwater
Ping on surfaced -Generates a ping whenever a surface event is detected (subject to the LoRa Tx calendar settings)
GPS on surfaced - Start to acquire a GPS fix on surfacing
Underwater enable - Turns on the surface detection mechanisms
Surface detection method - Select SWS (Salt Water Switch) for surface detection using physical contacts on the Tag shell or select GNSS to utilise the GPS receiver to detect when the Tag is surfaced. SWS is liable to long term degradation due to contamination of the surface contacts but is a lower power surface detection mechanism. GNSS is long term reliable but uses more battery power
GPS Surfacing Profile - Presets for tuning the GPS receiver to optimise surface detection speed with battery useage

Geofencing
LoRa Geofence -Enabling this will only allow the LoRaWAN transmitter to operate when the Tag is either OUTSIDE or INSIDE of a defined Geofence
OUTSIDE - Transmissions are only permitted when outside the geofence
INSIDE - Transmissions are only permitted when inside the geofence
Geofence #0 to #4 - Five separate geofence definitions where:
Longitude - Longitude of the first geofence centre
Latitude - Latitude of the first geofence centre
Radius - Radius of the first geofence

Misc
LED mode - Control how long the LED stays functional after the Tag is deployed OFF/30MINS/1HR/24HRS/ALWAYS